-1.png?width=200&height=51&name=LM_NuBlu_Horiz_Hi%20(1)-1.png)
Billing Edge allows your organization to associate a cost for you vehicles and charge for their usage without billing the driver. This is especially useful if your organization plans on billing interdepartmentally.
There are three different things that must be set up in Mission Control in order to fully enable this feature. In this document we will be creating up a couple of SKUs (one for revenue and another for an expense/discount), create a Pricing Ruleset (PRS) and a associating that PRS with a Service Group. On this things have been accomplished we'll review the new Billing section in Mission control and edit the invoice by adding and deleting SKUs/line items.
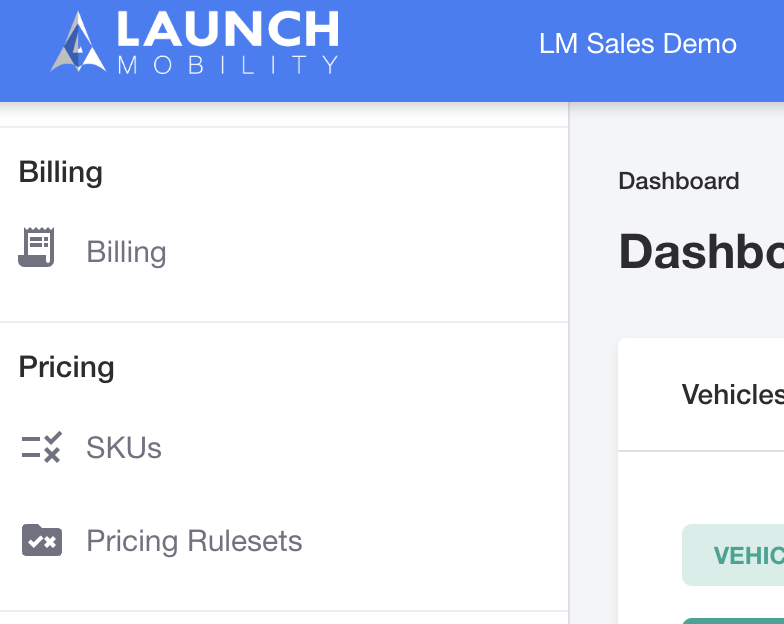
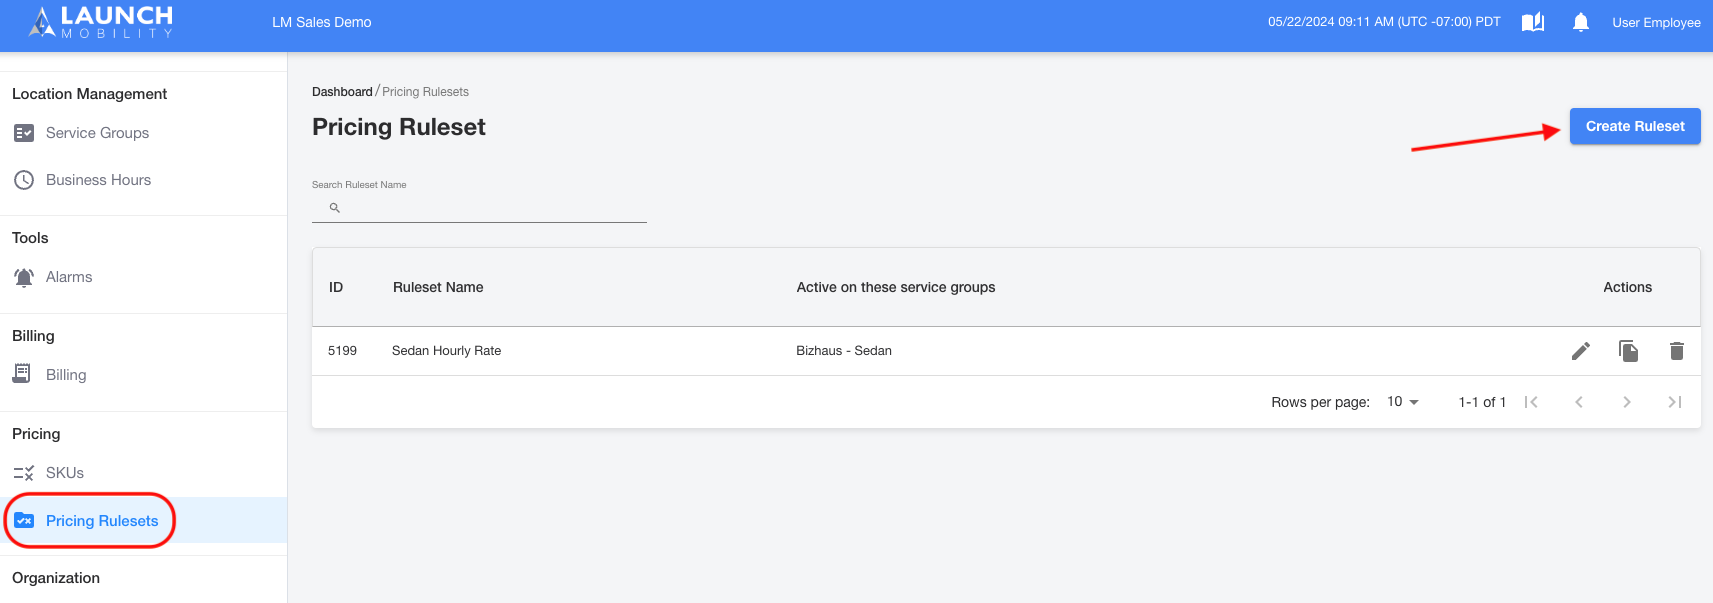
Once Billing Edge has been enabled for your organization, you'll notice a couple of new options in your navigation menu. You will now see Billing and Pricing Rulesets listed as choices.
Create a SKU
SKUs will appear as line items on your invoices. The first thing we're going to do is set up a daily rate for a group of luxury cars. This rate will be charged automatically once a reservation is created for one of these vehicles.
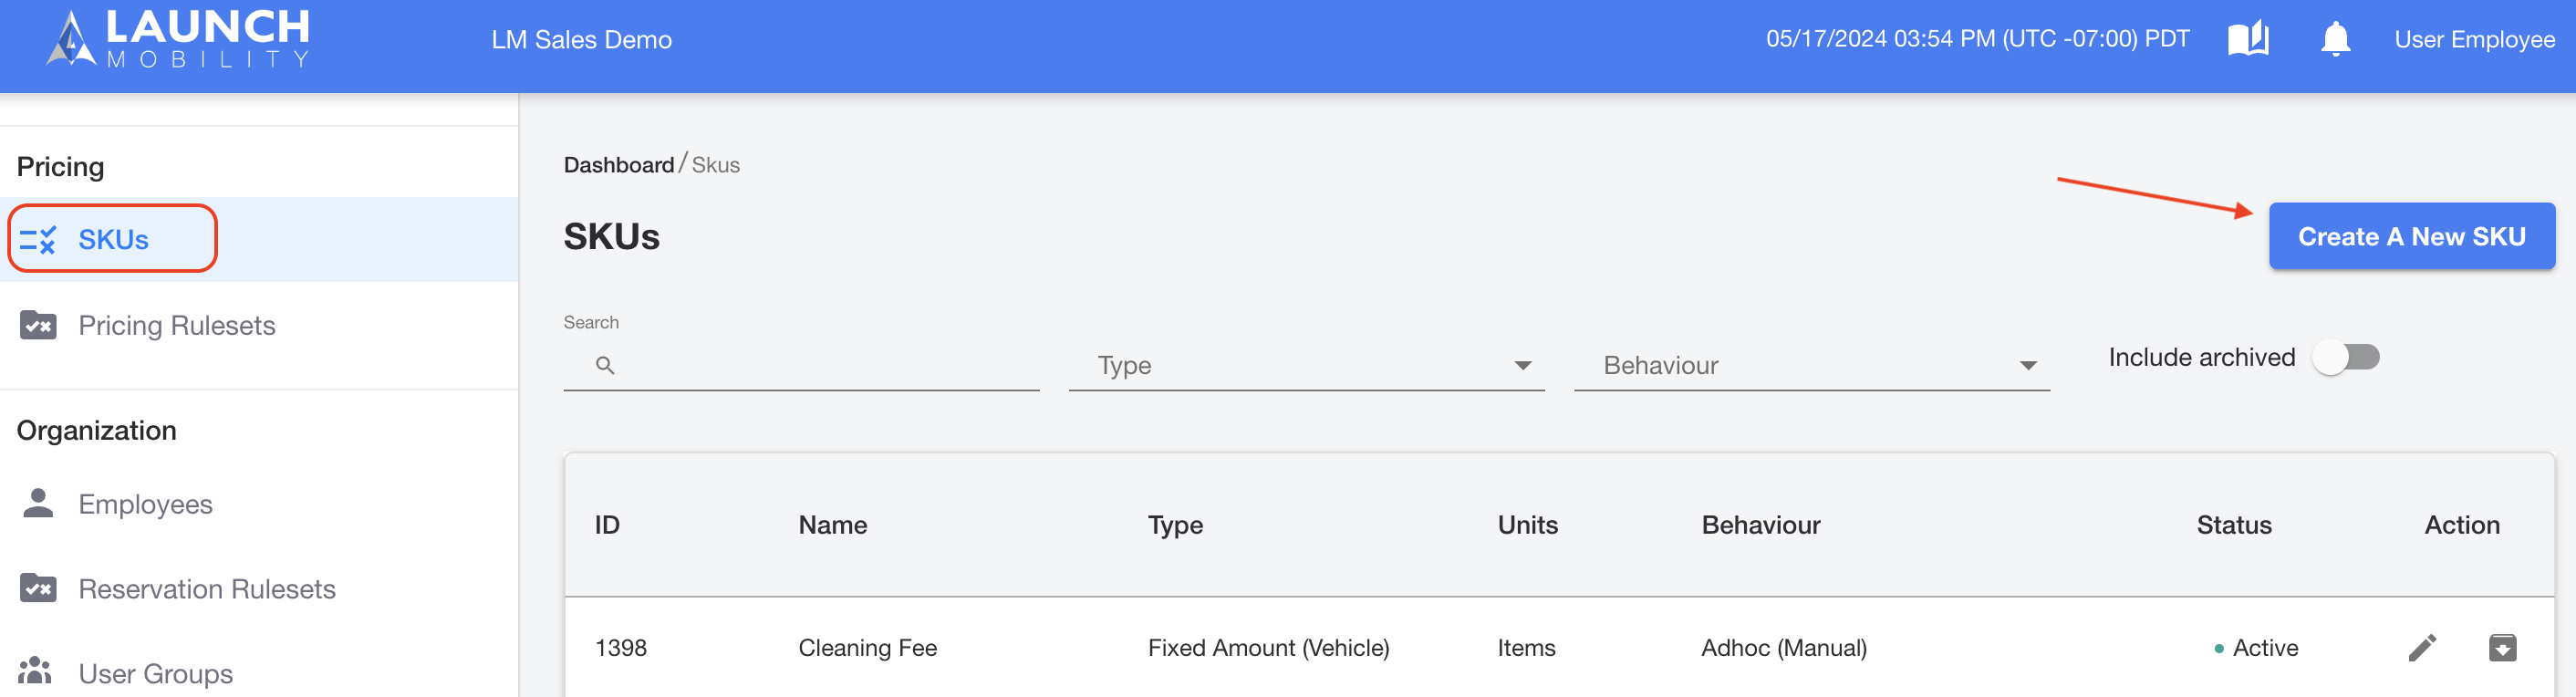
Navigate to SKUs in the navigation menu and then select the Create a New SKU button.
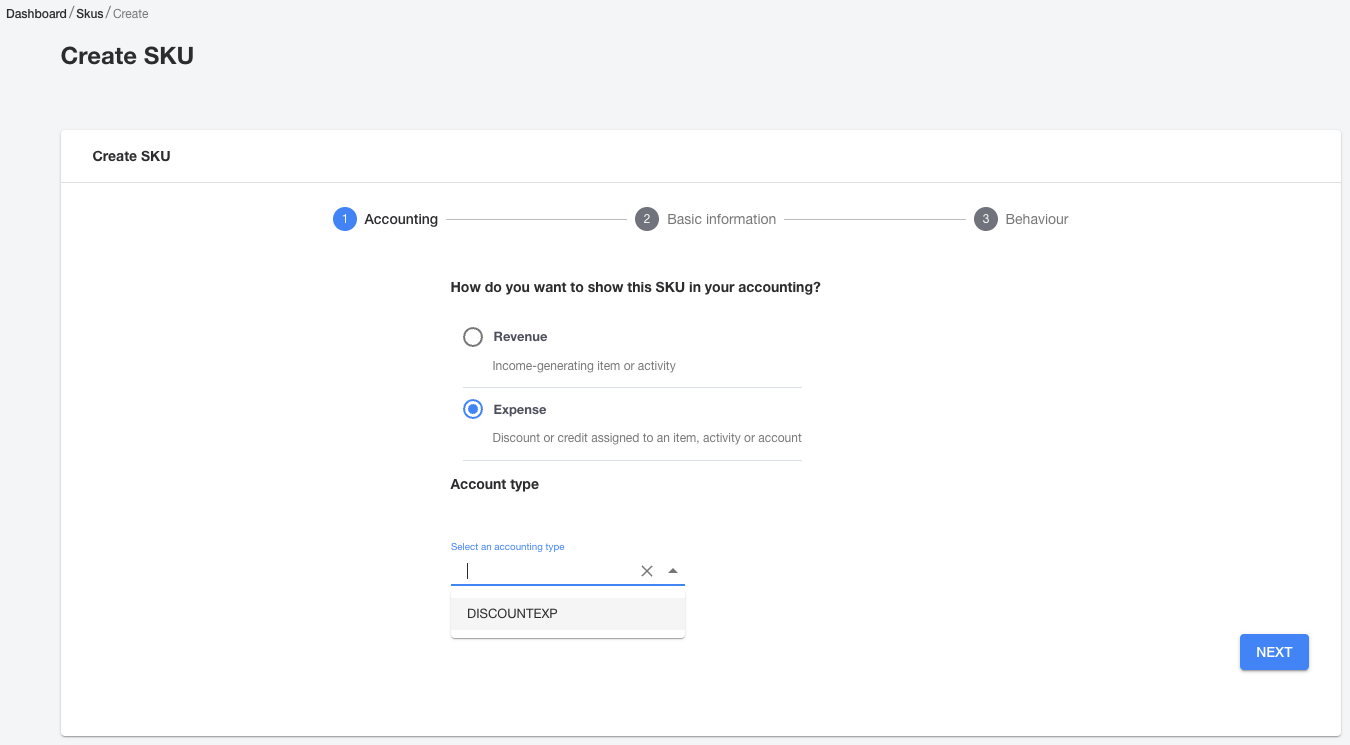
On the Accounting screen you will have the opportunity to choose whether you want to create a Revenue (income generating) or an Expense (discount or credit) SKU. Then you will select whether you're charging for services or for some type of penalty or fee.
Since we're setting up a SKU that will charge a daily rate for usage, we're going to select Revenue and Services Revenue on this screen. Once your selections have been made, click the Next button.

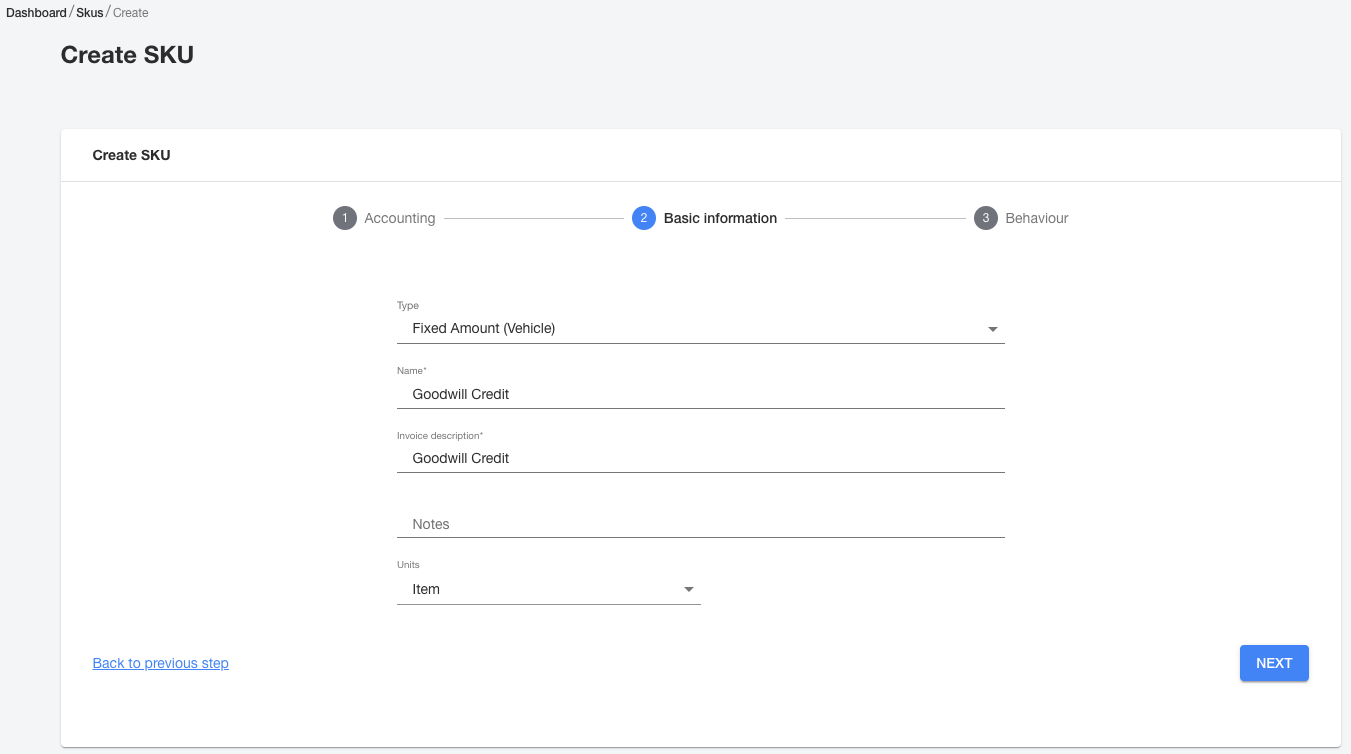
Next, you 'll need to fill out the information on the Basic Information screen. You'll choose a type, name your SKU, include a description and have the option to add notes if needed.
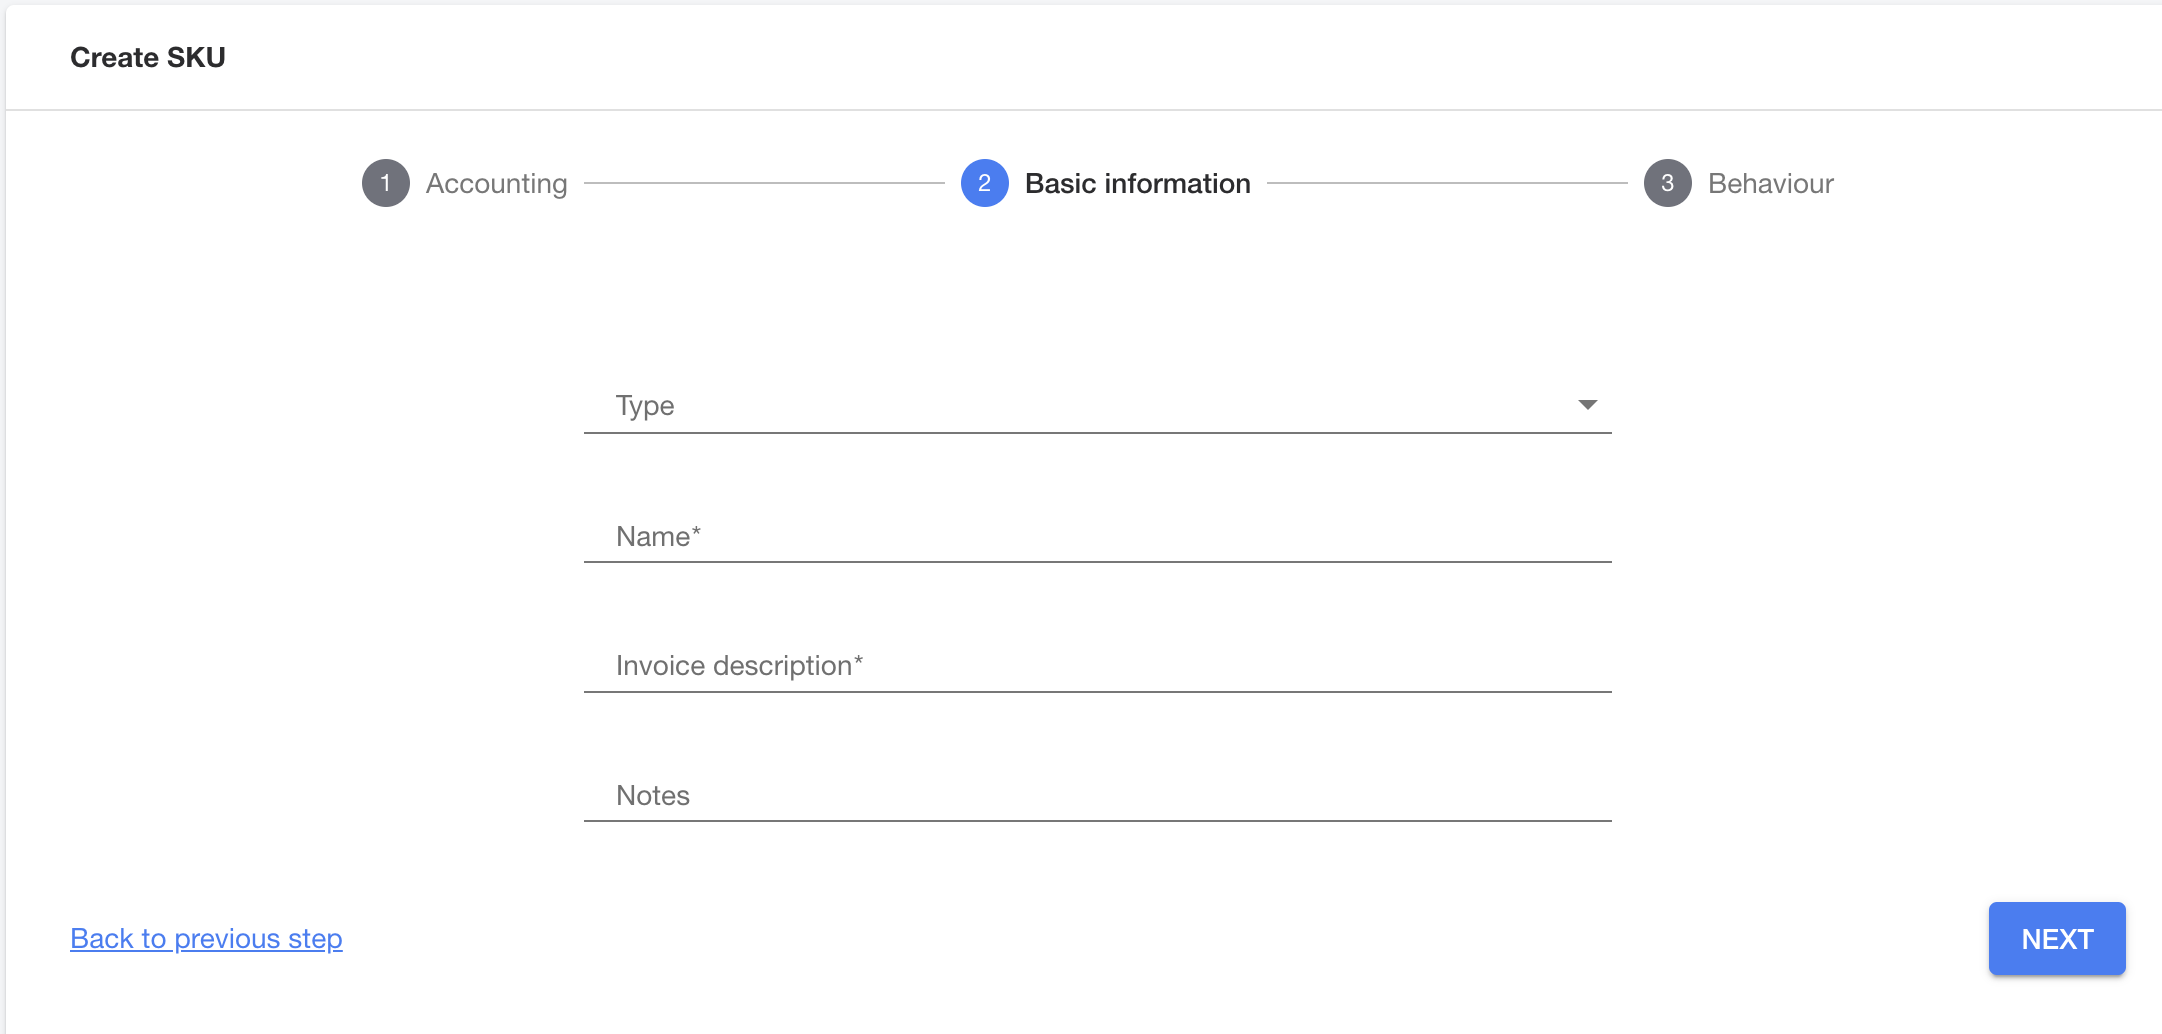
Below are the different options for type that you can choose on this screen:
- Time Used on Reservation
- Distance Driven during Reservation
- Reservation Returned Late
- Fuel/Charge Level at Reservation End
- Fixed Starting Price
- Cancellation Fee
- Fixed Amount (Vehicle)
- Fixed Amount (Driver)
In this example, we're setting up a SKU that's going to charge a daily rate for driving a vehicle. On this screen we're going to select Time Used on Reservation, we'll name the SKU Daily Rate and add a short description. Both the name of the SKU and the description will appear on the invoice. Select Next once the form has been filled out.
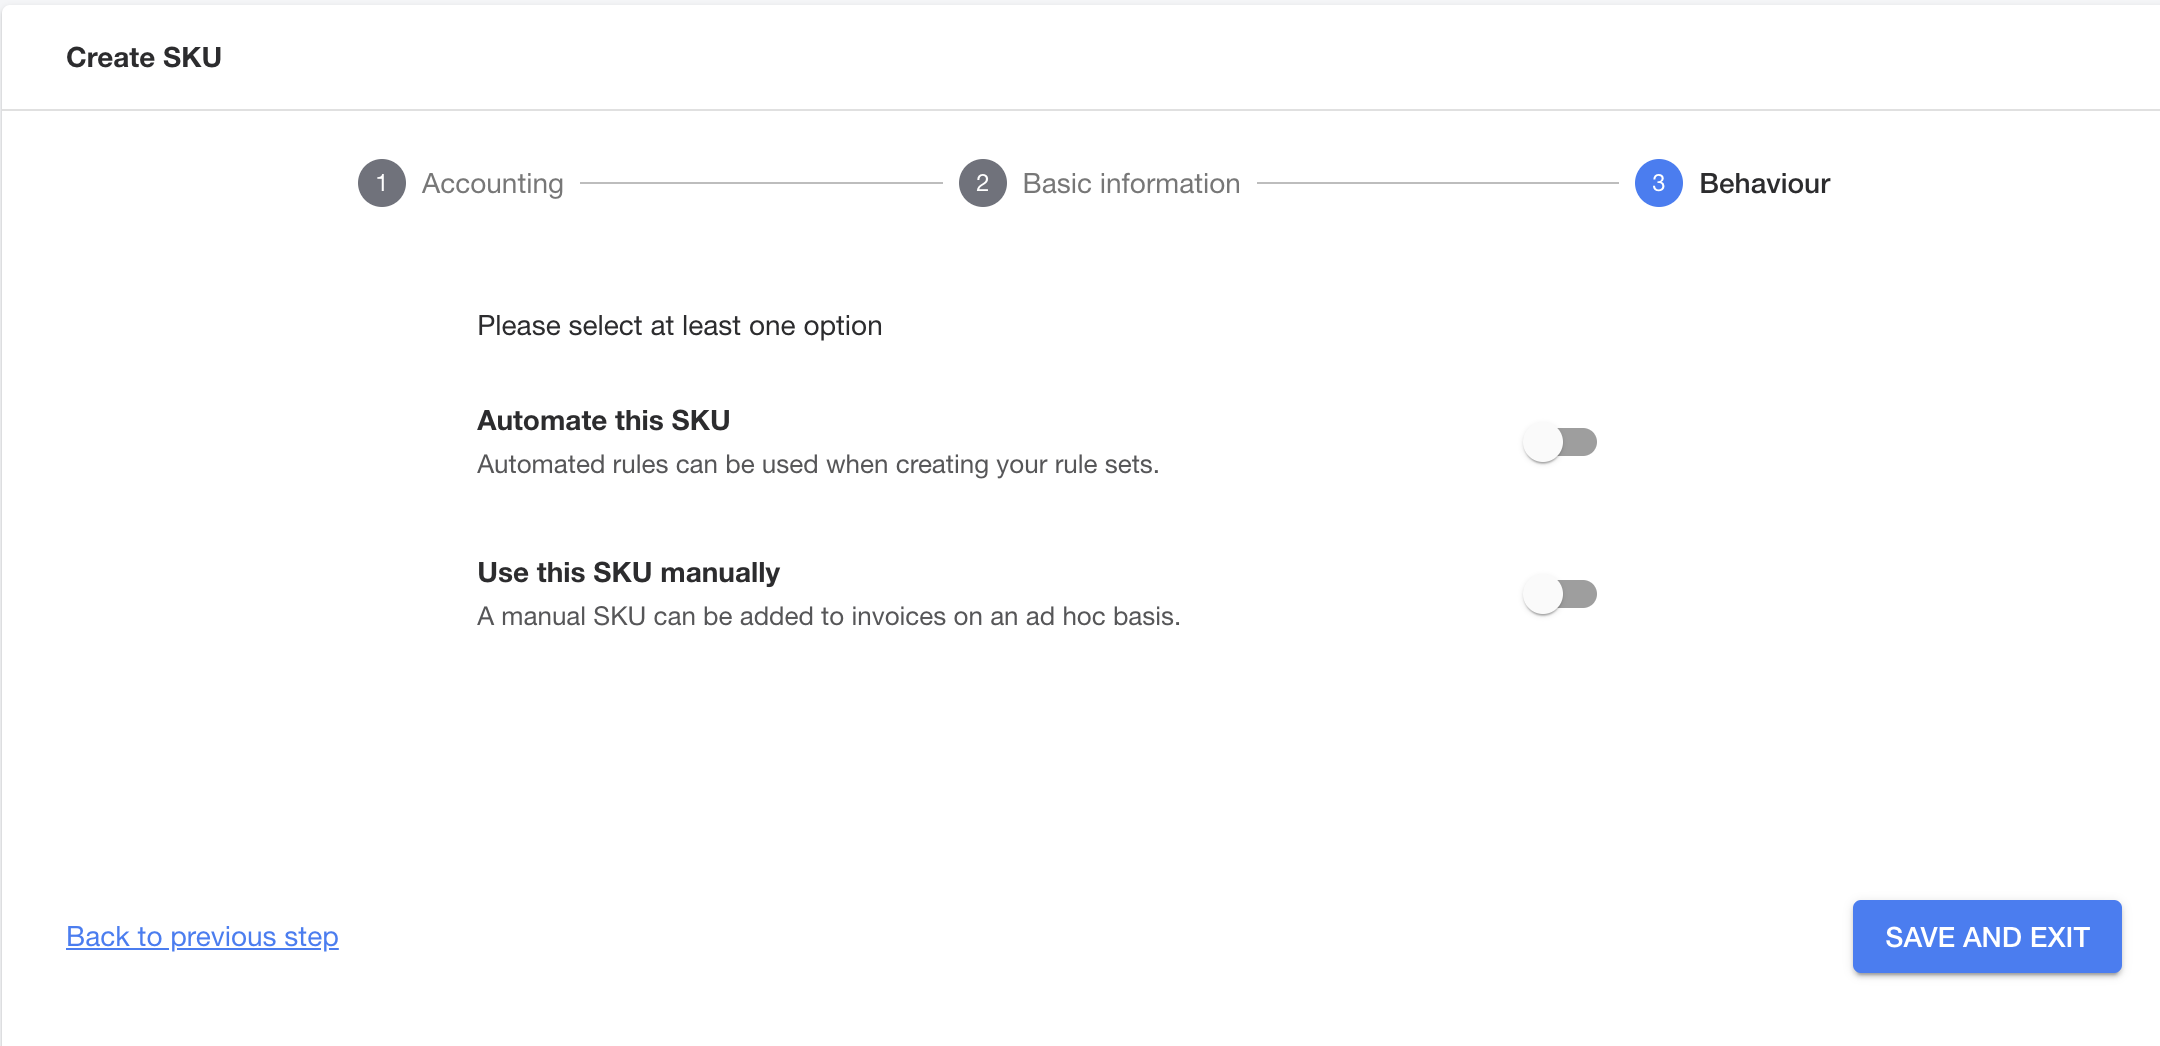
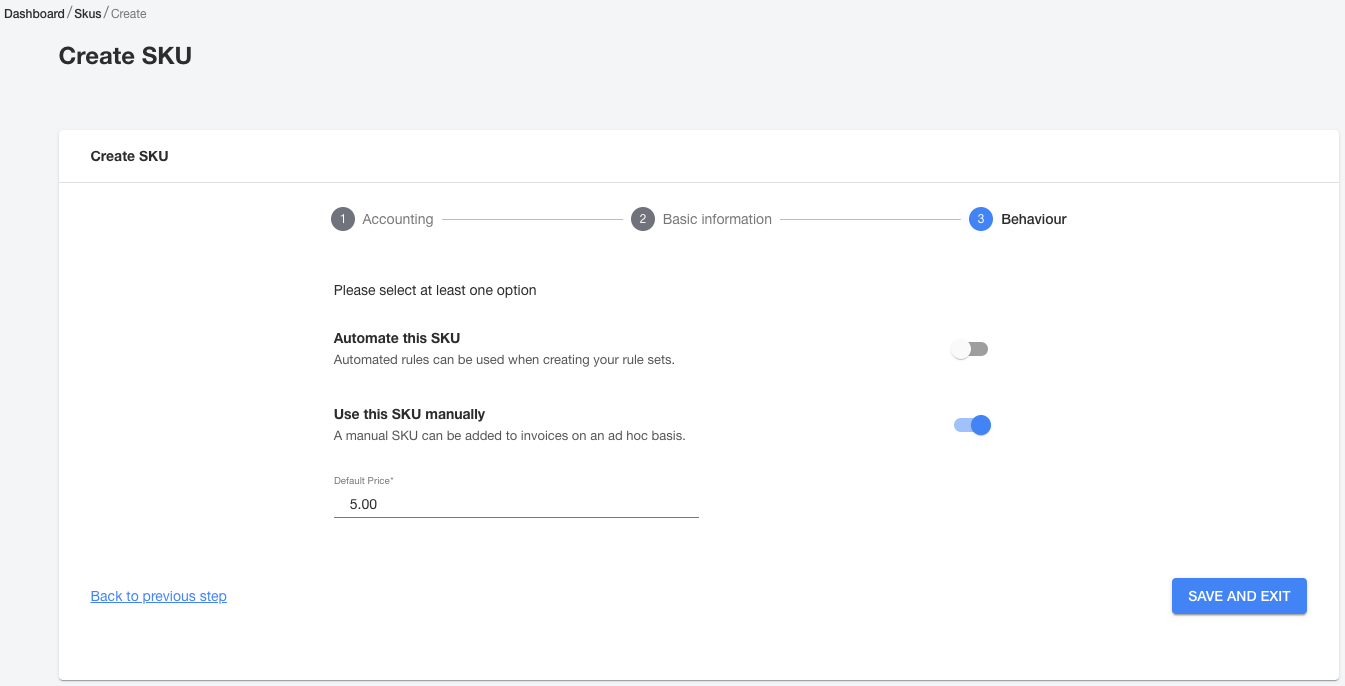
The last step in the SKU creation process is to choose it's behavior. You have the option to choose whether the SKU will be applied automatically or if it will need to be added manually to an invoice.
In this case, toggle the Automate this SKU option to on. This will allow us to associate this SKU to a PRS and we'll be able to have this charge added automatically to an invoice. Once your choice is made, select Save and Exit.
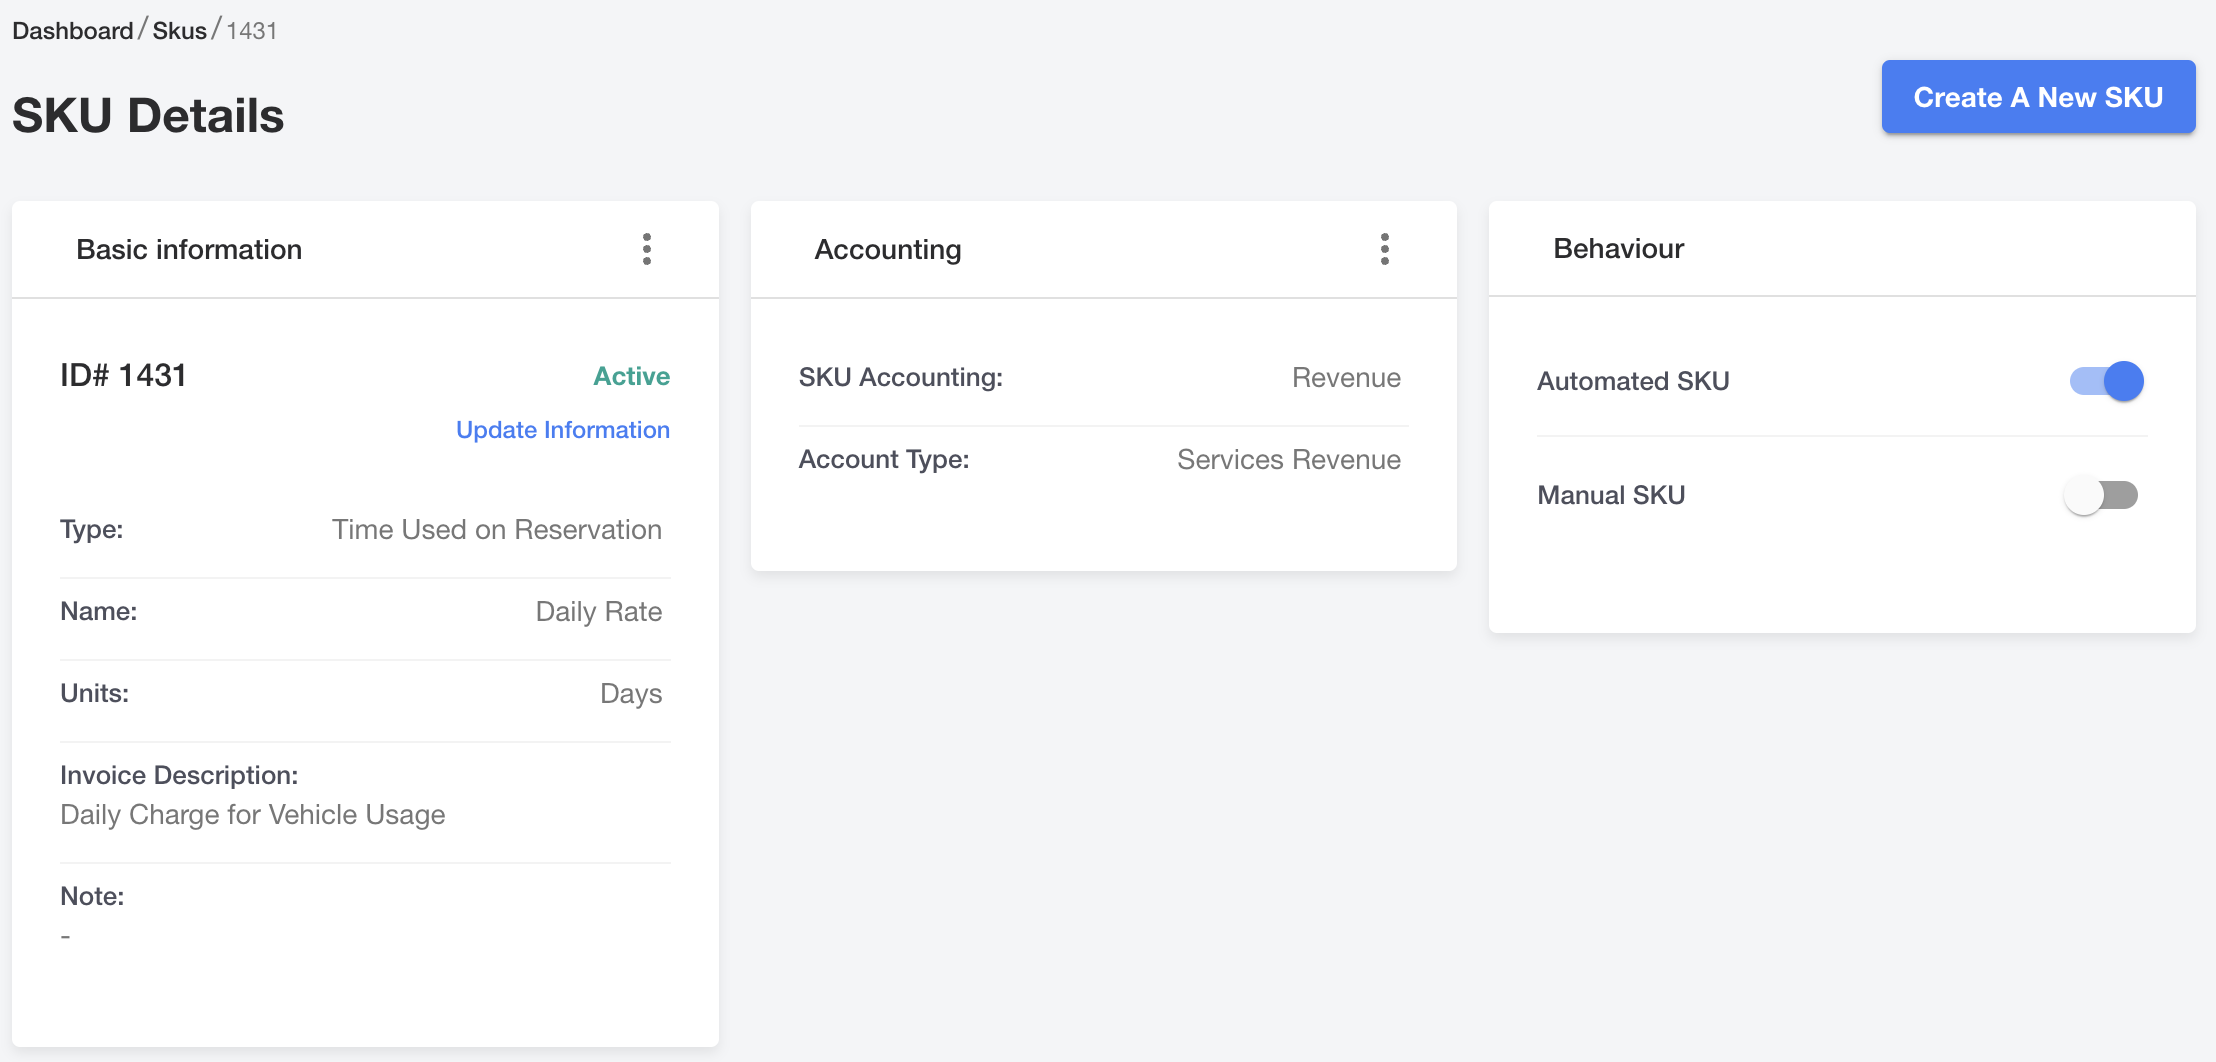
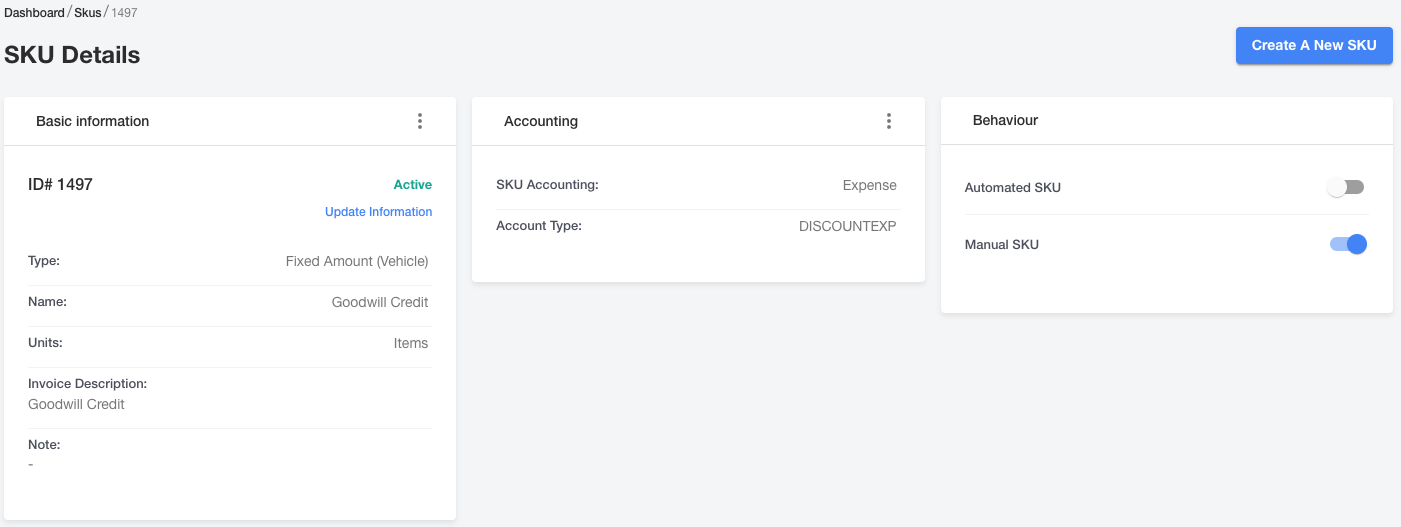
Now that the SKU creation process has been completed, you'll be redirected to the SKU Details page where you'll be able to review the details of what was just set up.
We'll now add an additional SKU but this one will set up to add a credit to an invoice. This process will be similar to what we just reviewed but with a couple of differences.
On the Accounting screen select Expense and then DISCOUNTEXP as your type, then click Next.
In the Type drop down list, select Fixed Amount (Vehicle) and proceed to fill out the remainder of the form by naming your SKU, giving it a description and choosing Item as a unit. Select the Next button once you've filled everything out.
We don't want this SKU to be applied automatically to invoices so we'll toggle the button letting the system know we want to use this manually. Once that button is toggled, you'll have the opportunity to select a default price/amount for the discount. Click the Save and Exit button.
You'll again be sent to the SKU details page where you can review everything that was just set up. You can make edits to you SKU by clicking Update Information located in the Basic Information section or by clicking the hamburger (3 dots) in the Accounting section.
Note: A SKU can be updated/edited only up until the time it's been added to an invoice. Once the SKU exists on an invoice no changes can be made. If any updates need to be made at that point a new SKU would need to be created.
Now that we've created a couple of SKUs, it's time to associate our automated SKU with a PRS.
Create a Pricing Ruleset (PRS)
A PRS gives us the ability to automatically apply a SKU to an invoice. In this case, we'll be adding our daily rate SKU to the PRS and then associating the PRS with a Service Group (SG). At that point, whenever a reservation is created for any vehicle that belongs to that particular SG, an invoice will automatically be generated and the daily rate applied. The process to create a PRS is as follows.
Navigate to Pricing Rulesets in the navigation menu and select Create Ruleset.
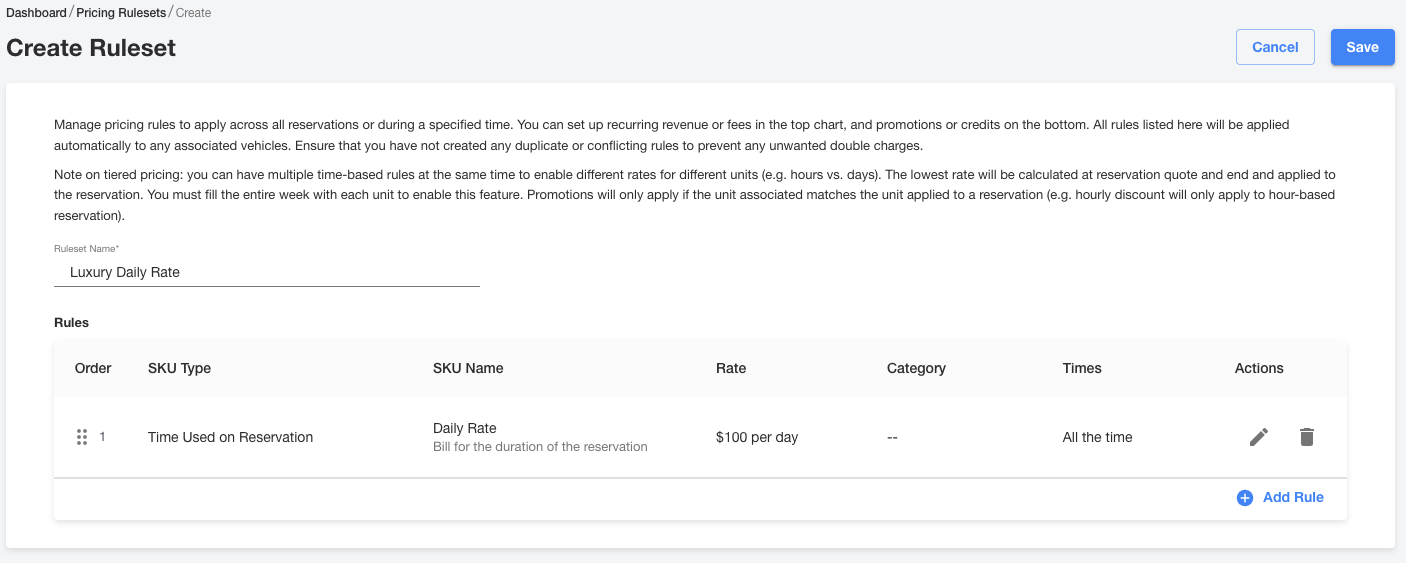
On this screen a name will need to be given to the PRS. In this example we're creating a daily rate for a group of luxury sedans. This PRS is named Luxury Daily Rate. Once the PRS is named, select Add Rule in the lower right hand side of the screen.

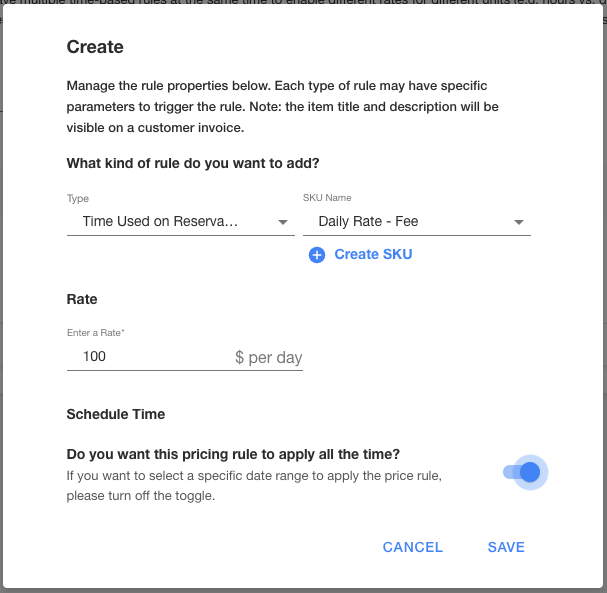
Next, you'll be filling out specific details for your PRS. In the Type drop down menu, we need to select the type for the SKU we just created, Time Used on Reservation. Once that selection is made, the SKU Name drop down will appear. Select the name of the SKU, Daily Rate in this example. Then you'll be asked to enter a rate, we're going to charge $100 per day. The price for these vehicles will remain the same 24/7 so we'll leave the button toggled on to let the system know we want this PRS to take effect all the time.
If you don't want this pricing to apply 24/7 you can toggle the button off. Now you'll have the ability to select the day and hour this PRS starts and when it ends. If you need to charge more on the weekends for a SG as an example, you'll need to create a second SKU for the weekend and assign it a different rate. You can then use this tool to let them system know there will be a certain PRS will take affect Monday - Friday and a different one for Saturday - Sunday. Both of these SKUs can be applied to the same PRS to ensure full week coverage.
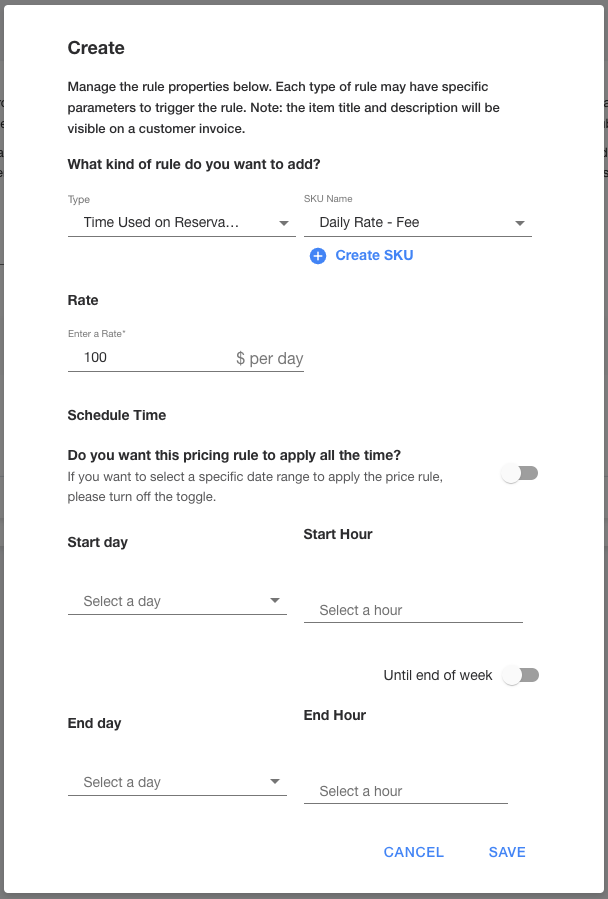
Click the Save button.
You'll be redirected back to the Create Ruleset screen where you can review a list of the SKUs that are associated with your PRS. Once everything has been reviewed and looks ok, select Save in the upper right hand corner.
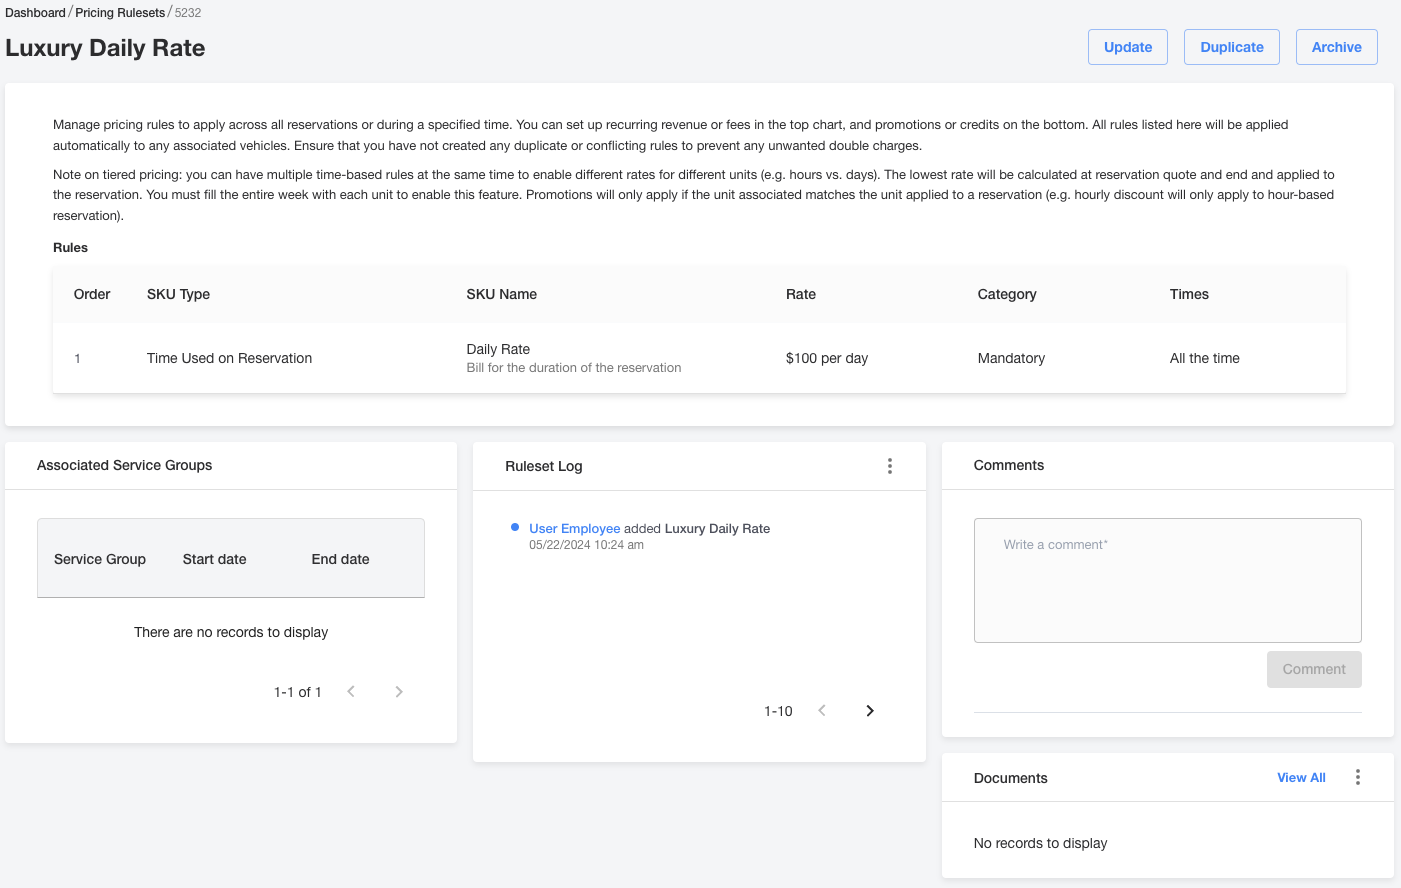
Now that the PRS has been successfully created you will be sent to its dashboard. Here, you'll be able to view the associated SGs and a log of actions.
Associate the Pricing Ruleset (PRS) with a Service Group (SG)
Now that we've created and set up our PRS (Luxury Daily Rate) we're now going to associate it with a SG. This will result in an invoice being generated once a reservation is created for these vehicles.
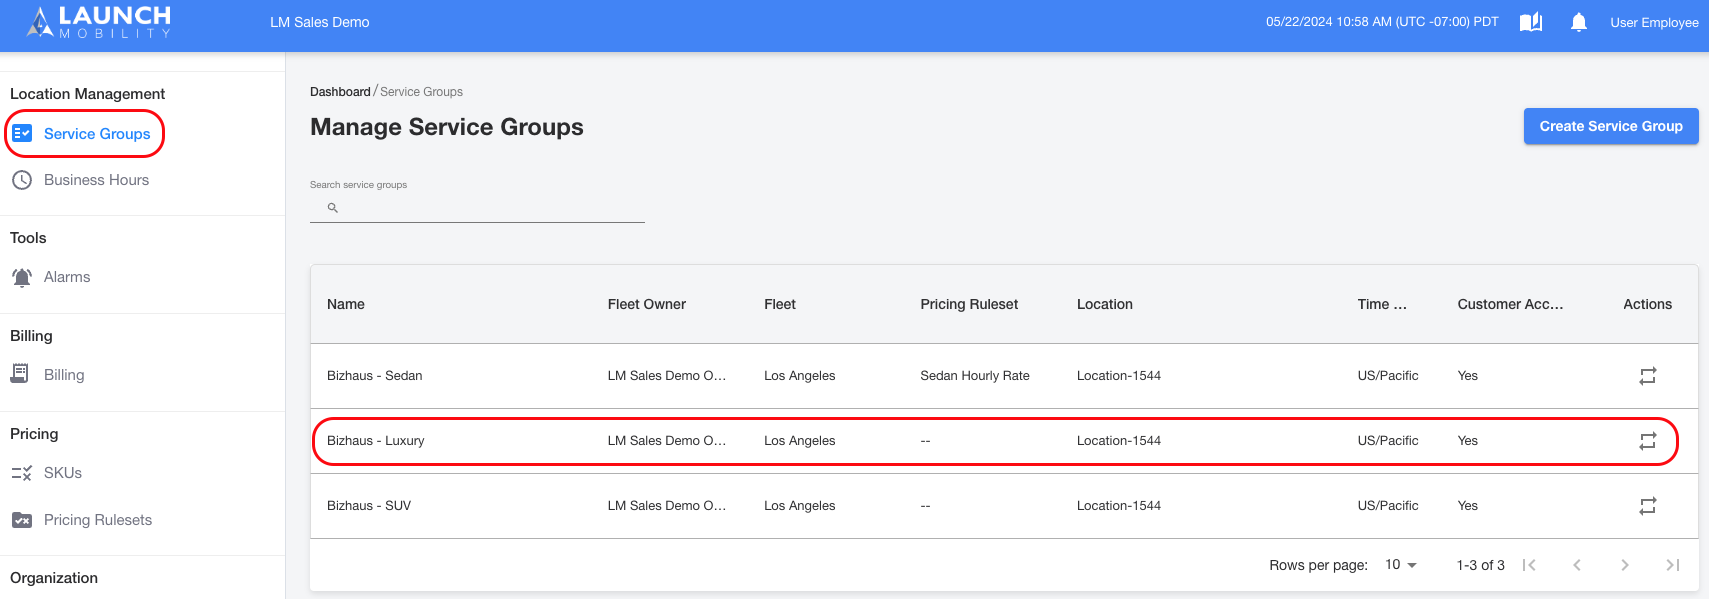
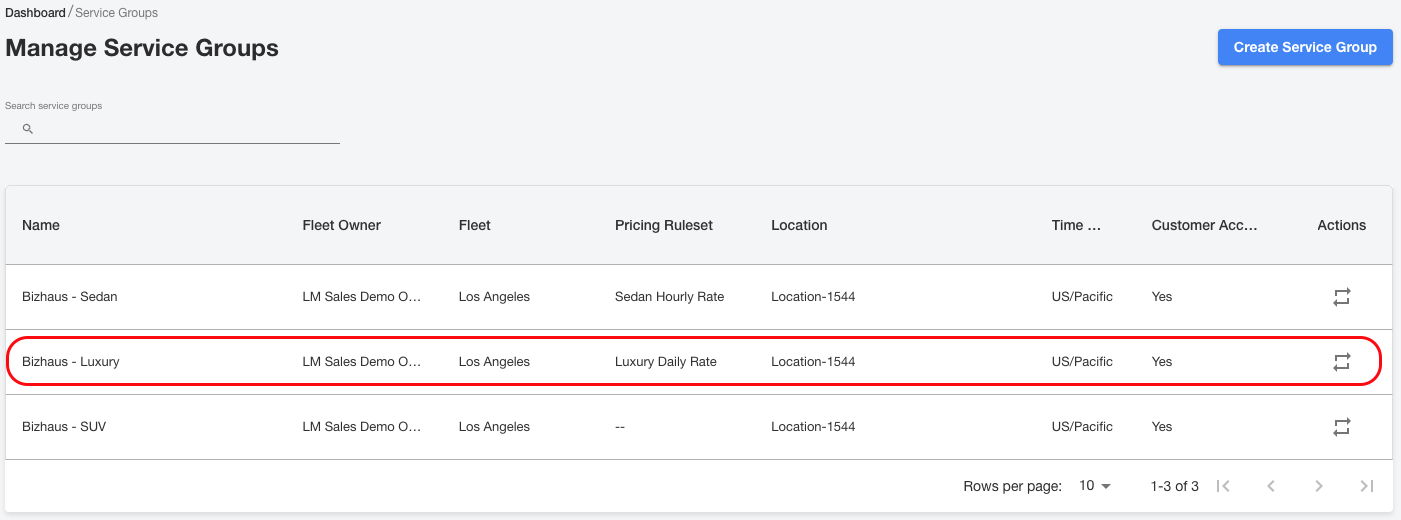
First, you'll need navigate to Service Groups in the navigation menu. You'll be presented with a list of existing SGs. Select the SG from the list that you'd like to associate the PRS with.
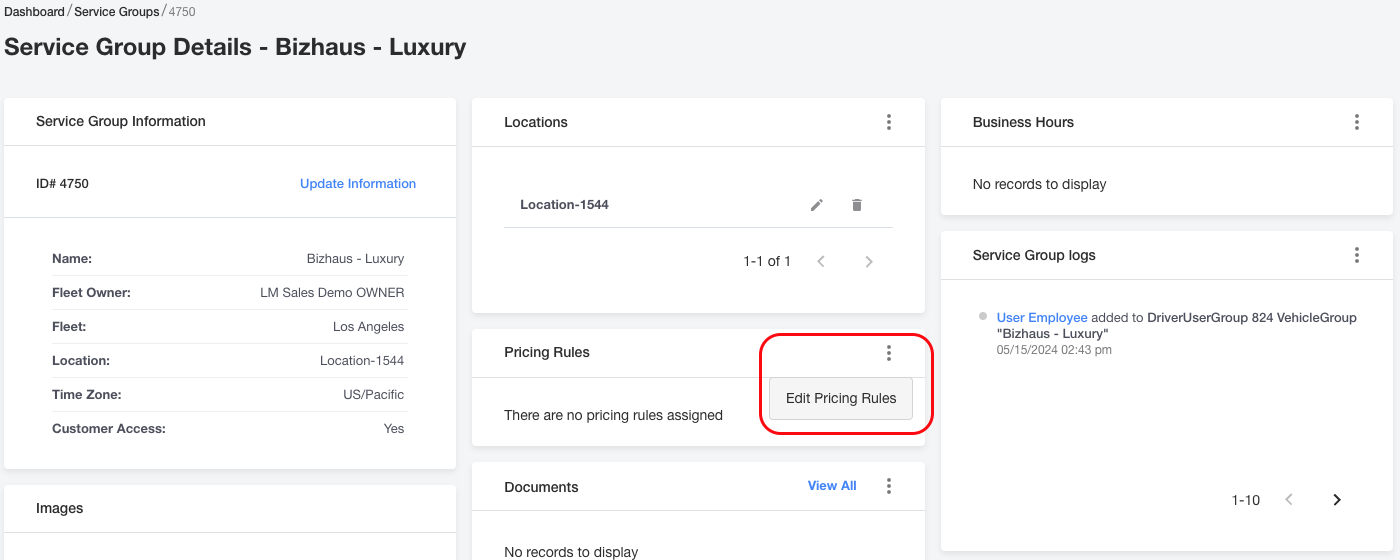
On the SGs dashboard you will see a Pricing Rules section, by default there will be no PRS assigned and there will be no charge for creating a reservation for any vehicles in this SG. Click on the hamburger and then select Edit Pricing Rules.
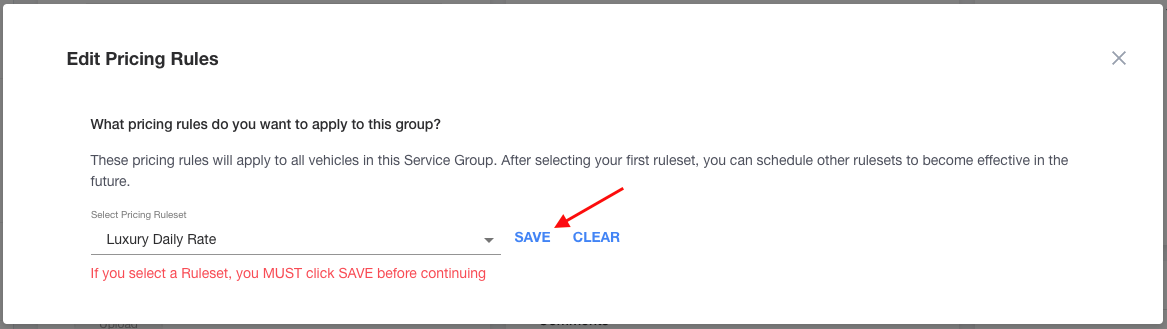
On this screen you'll be asked to select the PRS you want to apply to the SG. Select your PRS from the drop down and make sure to select Save once your choice has been made.
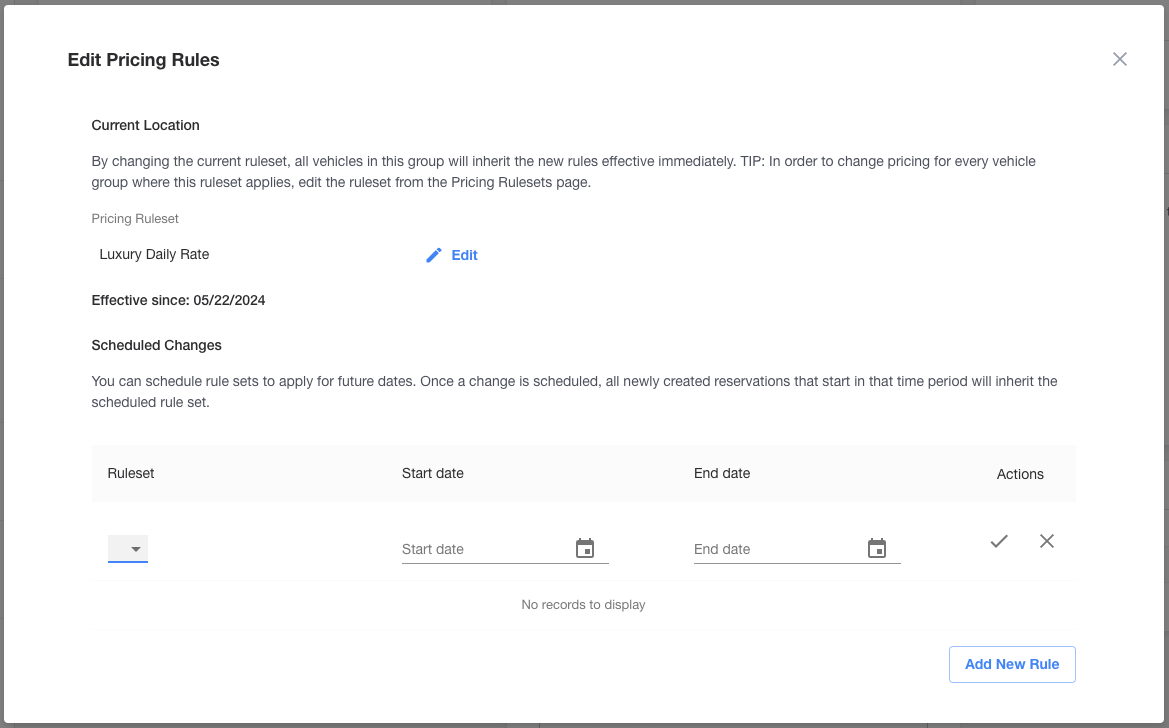
If you have a scheduled upcoming rate change for your SG, select the Add New Rule button. You'll be given the option to select a new PRS along with its start and end dates. Select the check mark once you've made your selection.
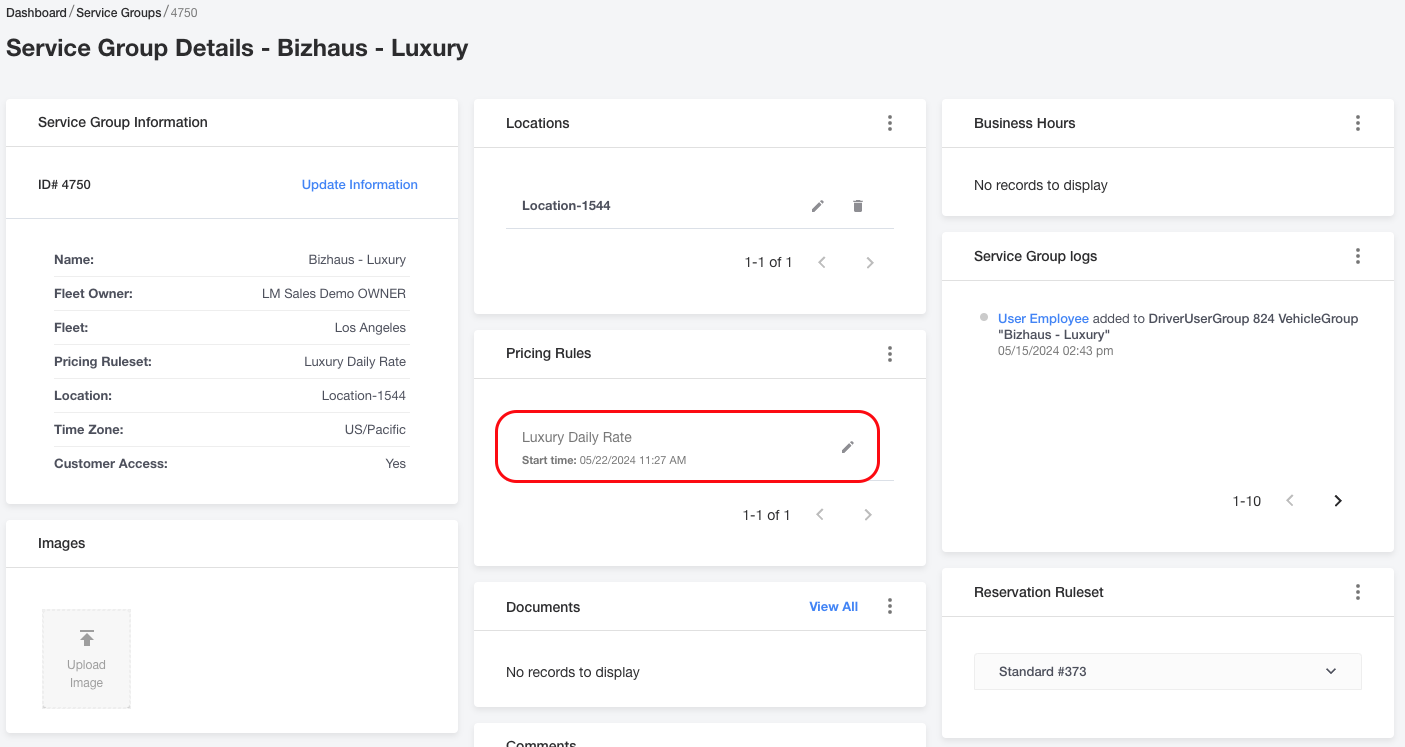
Back on the SG's dashboard, you'll now see the associated PRS in the Pricing Rules section. This is also visible on the list when selecting Service Groups from the navigation menu.
Now that everything has been properly set up, we'll review what an invoice looks like and what we need to do in order to update it.
Accessing and Editing Invoices
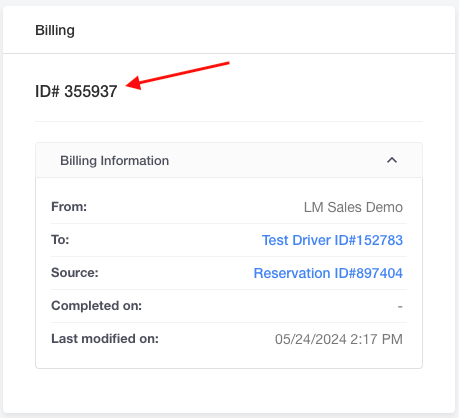
Once a reservation has been created for a vehicle in a SG (Bizhaus - Luxury) with a PRS (Luxury Daily Rate) associated, you will see a new section when you open the reservation's dashboard. You will notice a Billing section that lists information for the driver, reservation, completed date and last modified date. Select the ID# in order to open the Billing Details dashboard.
Note: If a SG doesn't have a PRS associated with it, this section will not appear on the reservation's dashboard.
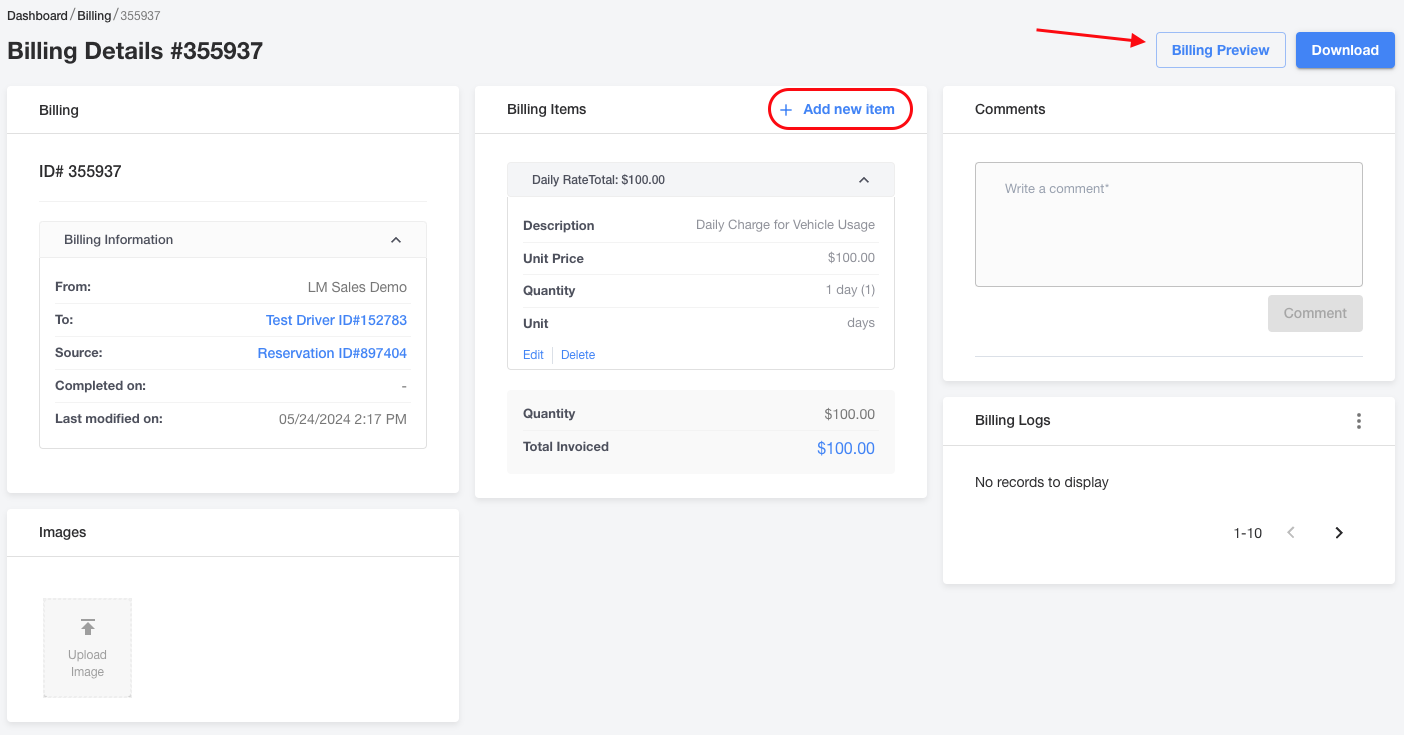
Here on the dashboard you'll have your first opportunity to view the line items/SKUs that have been added to the invoice. In this example our automated SKU (Daily Rate set at $100) has been automatically added by default since the PRS is associated with this SG.
You can add items/SKUs to your bill here by clicking + Add new item. This will open up a window that will give you the choice to add any manual SKU you've entered into the system to the invoice. Another option you have is to select Billing Preview.
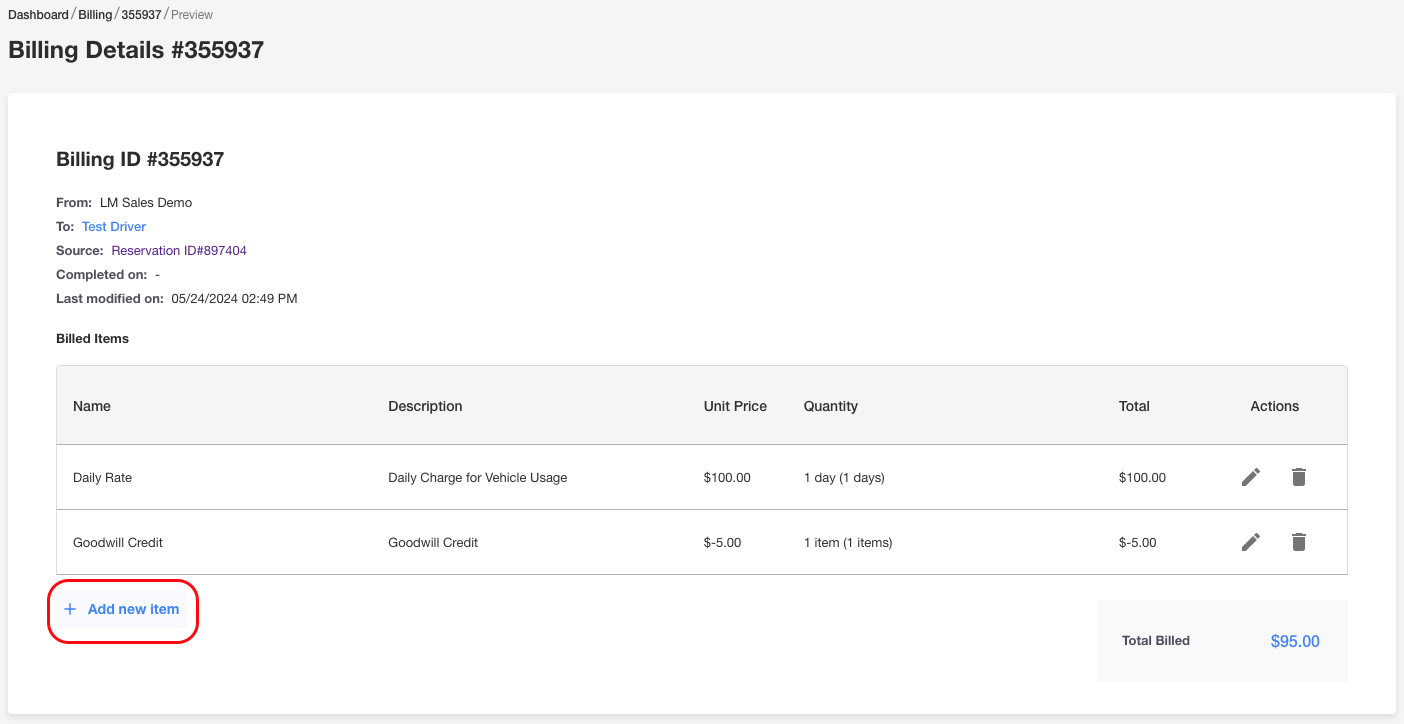
On this screen you'll be presented with the invoice in a different format. In the example below, we've selected + Add new item and selected the Goodwill Credit for $5 that we created earlier. It's been added to the list and the Total Billed amount will be updated with the new amount.
After creating a reservation, the system will give you a preview estimate based on the reservation criteria and make a reconciliation at the end. The charge will be equal to the minimum reservation duration as defined +/- any adjustments made to the start and/or end times.
This has been a step-by-step overview of Billing Edge in Mission Control!